Arches and Canyonlands National Parks Travel Guide

For Spring Break a few weeks ago, we went down to Moab, Utah to see Arches and Canyonlands National Parks. We had such a great time and were able to pack in a TON of hikes. Here is a break down of how we spent our trip.

Day 1:

On the first day we drove the quick 3 hours from Provo to Moab. We went straight to Arches National Park as soon as we arrived around 11:00 am. Because it was close to the middle of the day, there was a slight line to get into the park. We waited in line for about 20 minutes. When we drove by later in the week closer to the weekend, the line was even longer and looked to be quite a wait. 

We started off our trip at the Visitor's Center. We looked around the exhibits and watched the video. We also stopped for a few minutes to use the free internet, eat lunch that we brought and plan out our day. 
Arches National Park Visitor's Center photo
After lunch, we packed up our bags and drove the 20-ish minutes to Delicate Arch. It was as good as everyone says it is. Totally worth it! The day we went it was SUPER windy. So windy, in fact, that I lost my hat :( The hike took us about 2-2 1/2 hours round trip. This included a nice rest at the actual arch. 
Delicate Arch Photo
After Delicate Arch, we decided it was time to find our campsite. We stayed at Archview RV Resort and Campground that we booked through Hotels.com. There are a lot of campsites in and around Moab that are owned by the same company. And luckily the other places were able to give us directions to our campsite because our GPSes didn't know where our campsite was. It thought it was in the Colorado River...but once we found our campsite, we set up our tent (still in the crazy wind) and then went to have dinner with my aunt and her family who were also in Moab for Spring Break.

Day 2:

We were up before the crack of dawn on day 2. We drove the 30-40 minutes from our campsite to the Island in the Sky portion of Canyonlands National Park and headed to Mesa Arch to see the sunrise. We got there about 20 minutes before sunrise and there were already quite a few people there. It was beautiful to see the first morning light cut across the canyon. 
Mesa Arch Photo
After sunrise, we headed to the visitor's center to check out some maps, plan our hikes, and use the internet :) 

Our first hike of the day was to Whale Rock. It was a really fun hike up a HUGE slick rock. At the top we got a beautiful view of the area we were in. This was my favorite hike of the day. 
View from Whale Rock photo
View from Whale Rock
After Whale Rock, we drove up the road and hiked to the two outlook points of Upheaval Dome. This was truly a geological wonder. As we headed up to the second outlook point, we took a harder trail (unintentionally). On our way back we were on the easier trail and I wished that we had taken it to begin with. Make sure you look carefully for the cairns along this trail. 
Upheaval Doem photo
After our hike, we ate lunch at a nice picnic area near the Upheaval Dome trailhead. After lunch we were getting pretty tired so we just did outlook points for the rest of the day. We stopped at Green River Outlook which gave us a beautiful view and showed us why this National Park is called Canyonlands. After, we tried to stop at Grand View Point Outlook but the parking lot was full, so we backtracked a bit to go to Orange Cliffs Outlook and still got a spectacular view. 
Green River Outlook Photo
Green River Outlook 
By this point we were exhausted, so we left in the middle of the afternoon and headed to our campsite to rest for a bit. After our siesta, we headed into Moab for dinner and to look at some of the funny shops.

Day 3:

Day 3 we had another early start to see the sunrise in Arches National Park. We pulled into Panorama Point to see the sunrise. There was no one there with us and probably because it was not the greatest place to see sunrise, but it was the easiest place. 

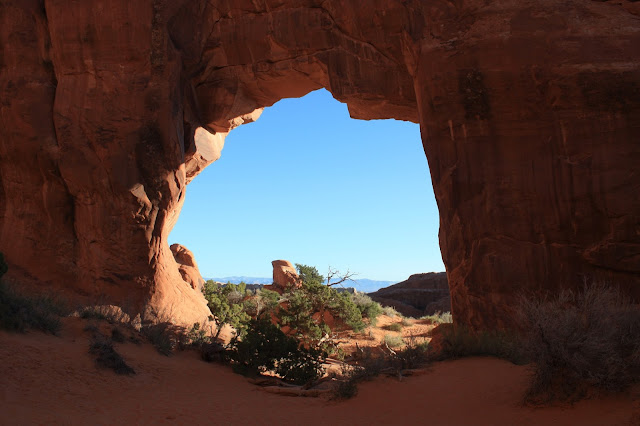
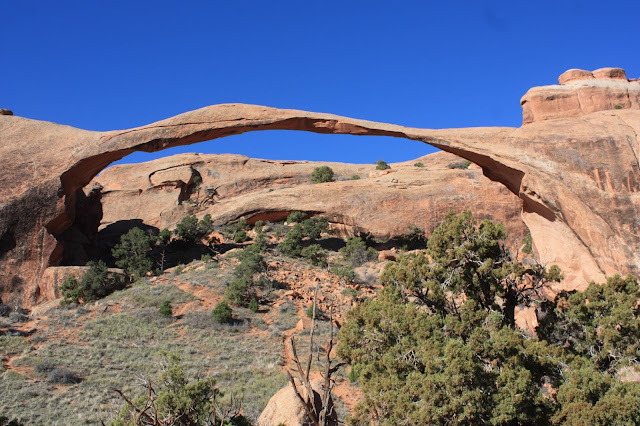
After sunrise, we headed to the Devil's Garden area of Arches to hike Landscape Arch. Because we hiked in the morning it was quite chilly for most of the hike mostly because a majority of the hike was in the morning shadows. Along out way we veered off the main trail to see Tunnel Arch and Pine Tree Arch. As we hiked to Landscape Arch, we were able to actually get a lot closer than we thought because the trail actually went for a quite a ways after the main plaque. 
Tunnel Arch photo
Tunnel Arch

Pine Tree Arch photo
Pine Tree Arch
Landscape Arch photo
Landscape Arch
As we got back to the car after Landscape Arch, we headed on a quick side-of-the-road hike to Skyline Arch. It was a super easy hike that ended at a wall of rock. At the end of the hike there are also lots of fun boulders that you could climb on. 
Skyline Arch photo
After Skyline Arch we headed to the outlooks for Delicate Arch. These outlooks are on the opposite side of the trail for Delicate Arch. The arch seems pretty small, but it is fun to see the landscape that you can't see from the hike. 
Delicate Arch Outlook Point picture
We made a stop for lunch at a picnic area across from the Balance Rock before heading to the Tunnel District for the afternoon. First we went to Turret Arch followed by the South and North Window. It was a pretty easy and fun hike where you could go right up under the arches. Then we headed across the parking lot to go to Double Arch, our favorite hike of the day. It was very short and was pretty much a giant playground. You could climb all over the arches and it was so beautiful. It also provided plenty of shade and incredible views. We made a quick stop at the Garden of Eden where we saw some rock climbers going up one of the huge pillars before heading back to the Visitor's Center. 
North and south window arches photo
North and South Window arches view from Turret Arch

Underneath Double Arch photo
Underneath Double Arch  
Garden of Eden photo
Garden of Eden
We went into town after leaving Arches and looked around at some of the outdoor adventure stores before having dinner at the Moab Diner. Then we headed back to our campsite after another long day.

Day 4:

After a restful night, we took our time in the morning taking down camp and re-packing our car. After we checked out, we headed towards Moab and went to another arch outside of Arches National Park. We headed to Corona and Bow Tie Arches. This is on BLM land and was a pretty fun hike. It was on the same strenuous level as Delicate Arch, maybe even a tiny bit harder. But it might have just seemed harder because we had hiked for 2 1/2 straight days and it was the hottest day we were there. But it was totally worth the view. Corona Arch is where people used to swing from until someone died and they prohibited such activity. But you can still hike right up to the arch and sit right underneath it.

Bowtie Arch photo
Bowtie Arch
Corona Arch  photo
Corona Arch 
After we hiked back, we had a quick lunch and hit the road to head home.

General Tips:

Labels: , , , , , ,

/* Posts ----------------------------------------------- */ .date-header { margin:0 28px 0 43px; font-size:85%; line-height:2em; text-transform:uppercase; letter-spacing:.2em; color:#357; } .post { margin:.3em 0 25px; padding:0 13px; border:1px dotted #bbb; border-width:1px 0; } .post-title { margin:0; font-size:135%; line-height:1.5em; background:url("https://resources.blogblog.com/blogblog/data/rounders/icon_arrow.gif") no-repeat 10px .5em; display:block; border:1px dotted #bbb; border-width:0 1px 1px; padding:2px 14px 2px 29px; color:#333; } a.title-link, .post-title strong { text-decoration:none; display:block; } a.title-link:hover { background-color:#ded; color:#000; } .post-body { border:1px dotted #bbb; border-width:0 1px 1px; border-bottom-color:#fff; padding:10px 14px 1px 29px; } html>body .post-body { border-bottom-width:0; } .post p { margin:0 0 .75em; } p.post-footer { background:#ded; margin:0; padding:2px 14px 2px 29px; border:1px dotted #bbb; border-width:1px; border-bottom:1px solid #eee; font-size:100%; line-height:1.5em; color:#666; text-align:right; } html>body p.post-footer { border-bottom-color:transparent; } p.post-footer em { display:block; float:left; text-align:left; font-style:normal; } a.comment-link { /* IE5.0/Win doesn't apply padding to inline elements, so we hide these two declarations from it */ background/* */:/**/url("https://resources.blogblog.com/blogblog/data/rounders/icon_comment.gif") no-repeat 0 45%; padding-left:14px; } html>body a.comment-link { /* Respecified, for IE5/Mac's benefit */ background:url("https://resources.blogblog.com/blogblog/data/rounders/icon_comment.gif") no-repeat 0 45%; padding-left:14px; } .post img { margin:0 0 5px 0; padding:4px; border:1px solid #ccc; } blockquote { margin:.75em 0; border:1px dotted #ccc; border-width:1px 0; padding:5px 15px; color:#666; } .post blockquote p { margin:.5em 0; } /* Comments ----------------------------------------------- */ #comments { margin:-25px 13px 0; border:1px dotted #ccc; border-width:0 1px 1px; padding:20px 0 15px 0; } #comments h4 { margin:0 0 10px; padding:0 14px 2px 29px; border-bottom:1px dotted #ccc; font-size:120%; line-height:1.4em; color:#333; } #comments-block { margin:0 15px 0 9px; } .comment-data { background:url("https://resources.blogblog.com/blogblog/data/rounders/icon_comment.gif") no-repeat 2px .3em; margin:.5em 0; padding:0 0 0 20px; color:#666; } .comment-poster { font-weight:bold; } .comment-body { margin:0 0 1.25em; padding:0 0 0 20px; } .comment-body p { margin:0 0 .5em; } .comment-timestamp { margin:0 0 .5em; padding:0 0 .75em 20px; color:#666; } .comment-timestamp a:link { color:#666; } .deleted-comment { font-style:italic; color:gray; } .paging-control-container { float: right; margin: 0px 6px 0px 0px; font-size: 80%; } .unneeded-paging-control { visibility: hidden; } /* Profile ----------------------------------------------- */ @media all { #profile-container { background:#cdc url("https://resources.blogblog.com/blogblog/data/rounders/corners_prof_bot.gif") no-repeat left bottom; margin:0 0 15px; padding:0 0 10px; color:#345; } #profile-container h2 { background:url("https://resources.blogblog.com/blogblog/data/rounders/corners_prof_top.gif") no-repeat left top; padding:10px 15px .2em; margin:0; border-width:0; font-size:115%; line-height:1.5em; color:#234; } } @media handheld { #profile-container { background:#cdc; } #profile-container h2 { background:none; } } .profile-datablock { margin:0 15px .5em; border-top:1px dotted #aba; padding-top:8px; } .profile-img {display:inline;} .profile-img img { float:left; margin:0 10px 5px 0; border:4px solid #fff; } .profile-data strong { display:block; } #profile-container p { margin:0 15px .5em; } #profile-container .profile-textblock { clear:left; } #profile-container a { color:#258; } .profile-link a { background:url("https://resources.blogblog.com/blogblog/data/rounders/icon_profile.gif") no-repeat 0 .1em; padding-left:15px; font-weight:bold; } ul.profile-datablock { list-style-type:none; } /* Sidebar Boxes ----------------------------------------------- */ @media all { .box { background:#fff url("https://resources.blogblog.com/blogblog/data/rounders/corners_side_top.gif") no-repeat left top; margin:0 0 15px; padding:10px 0 0; color:#666; } .box2 { background:url("https://resources.blogblog.com/blogblog/data/rounders/corners_side_bot.gif") no-repeat left bottom; padding:0 13px 8px; } } @media handheld { .box { background:#fff; } .box2 { background:none; } } .sidebar-title { margin:0; padding:0 0 .2em; border-bottom:1px dotted #9b9; font-size:115%; line-height:1.5em; color:#333; } .box ul { margin:.5em 0 1.25em; padding:0 0px; list-style:none; } .box ul li { background:url("https://resources.blogblog.com/blogblog/data/rounders/icon_arrow_sm.gif") no-repeat 2px .25em; margin:0; padding:0 0 3px 16px; margin-bottom:3px; border-bottom:1px dotted #eee; line-height:1.4em; } .box p { margin:0 0 .6em; } /* Footer ----------------------------------------------- */ #footer { clear:both; margin:0; padding:15px 0 0; } @media all { #footer div { background:#456 url("https://resources.blogblog.com/blogblog/data/rounders/corners_cap_top.gif") no-repeat left top; padding:8px 0 0; color:#fff; } #footer div div { background:url("https://resources.blogblog.com/blogblog/data/rounders/corners_cap_bot.gif") no-repeat left bottom; padding:0 15px 8px; } } @media handheld { #footer div { background:#456; } #footer div div { background:none; } } #footer hr {display:none;} #footer p {margin:0;} #footer a {color:#fff;} /* Feeds ----------------------------------------------- */ #blogfeeds { } #postfeeds { padding:0 15px 0; }

Tuesday, April 19, 2016

Arches and Canyonlands National Parks Travel Guide

For Spring Break a few weeks ago, we went down to Moab, Utah to see Arches and Canyonlands National Parks. We had such a great time and were able to pack in a TON of hikes. Here is a break down of how we spent our trip.

Day 1:

On the first day we drove the quick 3 hours from Provo to Moab. We went straight to Arches National Park as soon as we arrived around 11:00 am. Because it was close to the middle of the day, there was a slight line to get into the park. We waited in line for about 20 minutes. When we drove by later in the week closer to the weekend, the line was even longer and looked to be quite a wait. 

We started off our trip at the Visitor's Center. We looked around the exhibits and watched the video. We also stopped for a few minutes to use the free internet, eat lunch that we brought and plan out our day. 
Arches National Park Visitor's Center photo
After lunch, we packed up our bags and drove the 20-ish minutes to Delicate Arch. It was as good as everyone says it is. Totally worth it! The day we went it was SUPER windy. So windy, in fact, that I lost my hat :( The hike took us about 2-2 1/2 hours round trip. This included a nice rest at the actual arch. 
Delicate Arch Photo
After Delicate Arch, we decided it was time to find our campsite. We stayed at Archview RV Resort and Campground that we booked through Hotels.com. There are a lot of campsites in and around Moab that are owned by the same company. And luckily the other places were able to give us directions to our campsite because our GPSes didn't know where our campsite was. It thought it was in the Colorado River...but once we found our campsite, we set up our tent (still in the crazy wind) and then went to have dinner with my aunt and her family who were also in Moab for Spring Break.

Day 2:

We were up before the crack of dawn on day 2. We drove the 30-40 minutes from our campsite to the Island in the Sky portion of Canyonlands National Park and headed to Mesa Arch to see the sunrise. We got there about 20 minutes before sunrise and there were already quite a few people there. It was beautiful to see the first morning light cut across the canyon. 
Mesa Arch Photo
After sunrise, we headed to the visitor's center to check out some maps, plan our hikes, and use the internet :) 

Our first hike of the day was to Whale Rock. It was a really fun hike up a HUGE slick rock. At the top we got a beautiful view of the area we were in. This was my favorite hike of the day. 
View from Whale Rock photo
View from Whale Rock
After Whale Rock, we drove up the road and hiked to the two outlook points of Upheaval Dome. This was truly a geological wonder. As we headed up to the second outlook point, we took a harder trail (unintentionally). On our way back we were on the easier trail and I wished that we had taken it to begin with. Make sure you look carefully for the cairns along this trail. 
Upheaval Doem photo
After our hike, we ate lunch at a nice picnic area near the Upheaval Dome trailhead. After lunch we were getting pretty tired so we just did outlook points for the rest of the day. We stopped at Green River Outlook which gave us a beautiful view and showed us why this National Park is called Canyonlands. After, we tried to stop at Grand View Point Outlook but the parking lot was full, so we backtracked a bit to go to Orange Cliffs Outlook and still got a spectacular view. 
Green River Outlook Photo
Green River Outlook 
By this point we were exhausted, so we left in the middle of the afternoon and headed to our campsite to rest for a bit. After our siesta, we headed into Moab for dinner and to look at some of the funny shops.

Day 3:

Day 3 we had another early start to see the sunrise in Arches National Park. We pulled into Panorama Point to see the sunrise. There was no one there with us and probably because it was not the greatest place to see sunrise, but it was the easiest place. 

After sunrise, we headed to the Devil's Garden area of Arches to hike Landscape Arch. Because we hiked in the morning it was quite chilly for most of the hike mostly because a majority of the hike was in the morning shadows. Along out way we veered off the main trail to see Tunnel Arch and Pine Tree Arch. As we hiked to Landscape Arch, we were able to actually get a lot closer than we thought because the trail actually went for a quite a ways after the main plaque. 
Tunnel Arch photo
Tunnel Arch

Pine Tree Arch photo
Pine Tree Arch
Landscape Arch photo
Landscape Arch
As we got back to the car after Landscape Arch, we headed on a quick side-of-the-road hike to Skyline Arch. It was a super easy hike that ended at a wall of rock. At the end of the hike there are also lots of fun boulders that you could climb on. 
Skyline Arch photo
After Skyline Arch we headed to the outlooks for Delicate Arch. These outlooks are on the opposite side of the trail for Delicate Arch. The arch seems pretty small, but it is fun to see the landscape that you can't see from the hike. 
Delicate Arch Outlook Point picture
We made a stop for lunch at a picnic area across from the Balance Rock before heading to the Tunnel District for the afternoon. First we went to Turret Arch followed by the South and North Window. It was a pretty easy and fun hike where you could go right up under the arches. Then we headed across the parking lot to go to Double Arch, our favorite hike of the day. It was very short and was pretty much a giant playground. You could climb all over the arches and it was so beautiful. It also provided plenty of shade and incredible views. We made a quick stop at the Garden of Eden where we saw some rock climbers going up one of the huge pillars before heading back to the Visitor's Center. 
North and south window arches photo
North and South Window arches view from Turret Arch

Underneath Double Arch photo
Underneath Double Arch  
Garden of Eden photo
Garden of Eden
We went into town after leaving Arches and looked around at some of the outdoor adventure stores before having dinner at the Moab Diner. Then we headed back to our campsite after another long day.

Day 4:

After a restful night, we took our time in the morning taking down camp and re-packing our car. After we checked out, we headed towards Moab and went to another arch outside of Arches National Park. We headed to Corona and Bow Tie Arches. This is on BLM land and was a pretty fun hike. It was on the same strenuous level as Delicate Arch, maybe even a tiny bit harder. But it might have just seemed harder because we had hiked for 2 1/2 straight days and it was the hottest day we were there. But it was totally worth the view. Corona Arch is where people used to swing from until someone died and they prohibited such activity. But you can still hike right up to the arch and sit right underneath it.

Bowtie Arch photo
Bowtie Arch
Corona Arch  photo
Corona Arch 
After we hiked back, we had a quick lunch and hit the road to head home.

General Tips:

  • Parking is limited at both Arches and Canyonlands National Parks. Be prepared with a back-up plan in case the hike you want to go on has a full parking lot. 
  • Parking seems to get worse after 12:00 but starts to clear up after 3:00 or 4:00. 
  • Bring lots of water and sunscreen, regardless of the time of year.
  • The visitor's centers offer free wifi. It's a great place to quickly check your social media or throw up a few blog posts :)
  • The park rangers are super helpful! Ask them any question about hikes you are considering or recommendations they have based on your family and ability level. 
  • If you are planning on going to both Canyonlands and Arches National Parks, get the Southeast Utah Group Annual Pass. It is the same price as paying for each park separately but it is good for a whole year and you get into two national monuments as well with the pass!
  • The parks are much busier on the weekends, especially during the summer months.

Labels: , , , , , ,

0 Comments:

Post a Comment

Subscribe to Post Comments [Atom]

<< Home